Important
If you are restoring to a new site -even if it is a subdomain or directory of the main site- you must create a new database before the restoration. For detailed instructions on creating new databases, take a look at the relevant troubleshooting page.
 |
The primary reason of BRS' existence is to restore your database content. The database content is stored as files with SQL commands inside the installation/sql directory. BRS will connect to your database and execute these files –possibly modifying the commands if necessary to fit your database server– resulting in a fully populated database which is identical to that of your backed up site's.
BRS currently only supports MySQL–compatible database servers including MySQL itself (of course!), MariaDB, Percona, Amazon RDS, etc.
Warning
Different database servers, or even different versions of the same database server, may have incompatible changes. BRS tries to compensate for these differences whenever possible, but do keep in mind that there is a limit to what can reasonably be done.
At the top of the page you see which database you are about to restore. The first database you will be restoring is the "site's main database". That's the main database used by your backed up site to store its data. If you are using the Professional version of our software, and had defined multiple databases you will be restoring one backed up database after the other, but the "site's main database" is always the first one to restore. If you do not wish to restore a particular database you can click the red button found at the top of the page.
The warning about big packet sizes
 |
The backup software checks the maximum size of each individual row at backup time. If at least one row is bigger than 1 MiB it creates the file installation/large_tables_detected which contains the size (in bytes) of the biggest row detected across your database.
When BRS sees that file, it displays the message depicted above. This warns you that, depending on your server configuration, you might not be able to restore your database. Most database servers on commercial hosting have a fairly small “packet size” (maximum size of a SQL query that can be executed), usually around 1 MiB – hence the default detection limit. If the biggest row in your database is bigger than this “packet size” the restoration will fail with database error code 1153 and / or the error message ER_NET_PACKET_TOO_LARGE.
If you run across this problem and since this is a hard restriction by your server's configuration, if this happens you have exactly two choices: a. ask your host to increase the max_allowed_packet database configuration setting to the value described in the message, or b. if the host won't do that, you will have to go to a different host. If you are okay with data loss (the rows exceeding the maximum packet size will NOT be restored!) you can alternatively disable the Stop on other error setting under Advanced options.
Warning
Disabling the Stop on other error setting does not magically ‘fix’ the problem. It simply tells BRS to ignore the error message coming from your database server when it fails to restore the large database data. You WILL experience data loss. You will just not get an error about it. Make sure you understand the risk you are taking before choosing to go that route.
Connection information
The information in this pane is mandatory. It tells BRS how to connect to your database.
- Database type
PHP has up to two methods to connect to a MySQL–compatible database server:
mysqliis the older of the two methods, provided by themysqliPHP extension.PDO MySQLis the more modern method, provided by thepdo_mysqlPHP extension. We strongly recommend it for all site types, except WordPress. Do note that this option is not even offered in BRS for WordPress since WordPress itself only supportsmysqli.Note
There used to be a much older, much slower option called
mysql. This PHP extension was removed in PHP 5.5.0 released on June 2013. What Joomla confusingly calls "MySQL" is actually "PDO MySQL". Keep that in mind if you think that your favourite option in Joomla is not available; it is available in BRS, but only shown with its CORRECT name!- Database server host name
The database server's host name. Usually it's
localhost, but this is not always the case. If unsure, please ask your host, or consult your hosting account control panel.Important
localhostand127.0.0.1are not the same thing! They mean two entirely different things.localhosttries to connect over shared memory (Windows), or UNIX pipe (Linux, macOS).127.0.0.1tries to connect over TCP/IP networking. If you tried one of these when restoring to a local server (e.g. MAMP, XAMPP, WAMPserver, etc), try the other one before assuming the restoration script is broken. You will be surprised.If your host gave you a specific TCP/IP port to connect to, enter the hostname, a colon, and TCP/IP port. For example, if your host told you to connect to TCP/IP port 4242 on
db.example.comyou need to enterdb.example.com:4242. If no port is specified, the default TCP/IP port 3306 will be used; this is what the vast majority of database servers uses.If your host gave you the path to a UNIX socket to connect to, enter localhost, a colon, and the absolute path to the UNIX socket. For example, if your host told you to use the UNIX socket
/var/run/db.sockyou need to enterlocalhost:/var/run/db.sock.- User name
The username of the database server user.
Please make sure that the database user you are using has all privileges for the database you are restoring to. By far the most common mistake restoring a site is that you created a database and a database user, but forgot to give your database user full privileges to the database you created. Go back to your hosting control panel and do that before assuming there is a bug; millions of successful restorations say that there is no bug, and hundreds of support tickets with this common issue say that it's very likely this simple step was accidentally forgotten. Don't worry, everyone has made that mistake at some point, even us.
Also keep in mind that when creating a database user you can either create a user able to connect from any IP address (defined as
username@%), or a user who's only able to connect from a specific IP or hostname (defined as[email protected]or[email protected]). In the latter case, the hostname/IP address must match where the connection is coming from which might not be the web server's public IP address. In all cases, the user name you enter in this field is justusername. The rest of it is how you tell your database server where the connection is expected to come from, not a part of the username itself.Finally, note that commercial hosts usually apply a prefix to your username. If you see an entry box for a username prefixed by something like
abcd12_and you enter the usernamealicein the text box next to it then your database username isabcd12_alice. This is especially important on hosts using cPanel or Plesk which exhibit this behaviour by default.- Password
The password of the database server user.
- Database name
The actual name of the database you want to restore to. If you choose a database which already has tables in them, existing tables with the same name as the ones being restored will be overwritten (replaced) by default. You may want to ask your host for the correct value of this setting.
As noted above, when restoring to a new subdirectory, subdomain, domain, or server you must create a new database before the restoration. For detailed instructions on creating new databases, take a look at the relevant troubleshooting page.
Please note that commercial hosts usually apply a prefix to your database name. If you see an entry box for a database name prefixed by something like
abcd12_and you enter the database namestoragein the text box next to it then your database name isabcd12_storage. This is especially important on hosts using cPanel or Plesk which exhibit this behaviour by default.Important
While it is possible to store the database tables of multiple sites in the same database it is very strongly not recommended. First of all, the performance will be degraded for all sites, as it depends on the total size of the entire database (especially when using InnoDB tables, like most modern PHP software tends to do). Second, it makes it far more likely that you will accidentally end up leaving unused tables behind or, at worst, deleting the tables of another site. If your host restricts the number of database you can create under a user account beyond a reasonable limit, go to another host.
- Database table name prefix
Especially applicable to Joomla! and WordPress. Most modern PHP software puts a common prefix in front of all database table names. It's usually two to four letters and numbers, followed by an underscore.
Important
Do NOT use any uppercase letters here. This has to do with the way MySQL–compatible servers handle table names on Windows and macOS when using case-insensitive filesystems such as FAT32, exFAT, NTFS, HFS+, and APFS. The details are complicated, but what you should keep in mind is that if you use UPPERCASE or MixedCase prefixes you will very likely have a problem restoring your site to a different server.
Warning
Always end your database prefix with an underscore. While it's not enforced by most PHP scripts (including Joomla and WordPress), if your prefix does not end with an underscore you can reasonably expect many things to break in unexpected ways on your restored site.
For best results, stick with 2 to 4 basic alphanumeric characters (lowercase letters a to z without accents or diacritics excluding compound or calligraphic characters such as or , and numbers 0-9) followed by exactly one underscore.
Uncommon Options
When using the Joomla! or Generic BRS platform you will see a list of uncommon options under the connection information.
- Database port
You can enter the database port instead of including it with the hostname.
- UNIX socket / Windows Named Pipe
If you are connecting to your database server using a UNIX socket (e.g.
unix:/tmp/mysql.sock) or a Windows Named Pipe (e.g.\\.\MySQL) you can enter it here instead of with the hostname.- Use SSL/TLS
Do you want to connect to MySQL using SSL/TLS? This can be used to encrypt the database connection and optionally to log you into it without using a password. You will need to supply the path of the MySQL client key and certificate file. This is a very uncommon option, practically only ever used with cloud-based database servers, or hardened corporate environments.
- SSL Ciphers
Only used when Use SSL/TLS is enabled. A colon separated list of the encryption ciphers to use for the SSL/TLS connection. The default list is
AES128-GCM-SHA256:AES256-GCM-SHA384:AES128-CBC-SHA256:AES256-CBC-SHA384:DES-CBC3-SHA.- SSL Certificate file
Only used when Use SSL/TLS is enabled. The absolute filesystem path to the client certificate file in PEM format.
- SSL Key file
Only used when Use SSL/TLS is enabled. The absolute filesystem path to the client key file in PEM format.
- SSL CA file
Only used when Use SSL/TLS is enabled. The absolute filesystem path to the Certification Authority (CA) file for connecting to the server, in PEM format. This is only taken into account when Validate Server Certificate is enabled.
- Verify Server Certificate
Only used when Use SSL/TLS is enabled. Verifies the server response against the Certification Authority (CA) file. You must provide the CA file for this option to work correctly. If your database restoration consistently fails try disabling this option.
Advanced options
The options here control how the restoration engine works. They can be used for advanced site transfers across different database environments, and special use cases. In most use cases, please leave these settings as-is.
- With existing tables
What should BRS do with any tables already present in the database?
Drop. Drops (deletes) any tables which have the same name as a table being restored. This is the default and recommended setting when restoring to a slightly older version of your site within the same Joomla / WordPress version family, and the same third party software installed.Backup. Renames any tables which have the same name as a table being restored, changing their prefix to bak_. If an older backup table exists, it will be deleted. This is a legacy setting which is not recommended as it results in database size bloating.Drop Same Prefix. Deletes all tables whose name starts with the Database table name prefix, regardless of whether a same-named table exists. This is the recommended setting when restoring to a much older version of your site, a backup with a different Joomla / WordPress version family, or a backup with different third party software installed. This is also the recommended setting when transferring a site to a new server.Drop All. Deletes all tables in the database. This is a dangerous option. Everything in the database will be removed. This is the option you want when you have messed up your database so badly you want to start over.Warning
Do NOT use this option if there are other sites or software using the database you are restoring your site into. It will remove their data, breaking them. Deleting data is irreversible.
- Select which database items to restore
Enable this option to display a multi-select box where you can choose which tables, procedures, functions, triggers, and events you want to restore.
Select which database items in the backup should be restored. Make a multiple selection with CTRL-click (Windows, Linux) or CMD-click (macOS). Any database item you have not selected here will not be restored; it will be skipped over.
This allows you to only restore select database items. This might be desirable if you know exactly which tables are affected by the problem you want to solve, and you don't want to overwrite other data in other tables. For example, if an article's contents were accidentally overwritten and you want to restore that content, without breaking e-commerce orders placed on your site between the backup time and restoration time, you could choose to only restore the table #__articles (Joomla!) / #__posts (WordPress).
Note
You will notice that the restoration seems to proceed as normal, going through each SQL file. This is correct. The restoration engine does read each SQL file, but only executes the restoration commands for the database items you have selected. The data size appearing in the progress dialog is actually the amount of data read from the SQL files, not the amount of data written to the database.
- Suppress foreign key checks
A lot of software uses a database feature called “foreign key constraints” to keep track of relationships between records across multiple database tables. These constraints are enforced at the database level. You cannot delete a table with records referenced by another table. You cannot create database rows referencing records in another table which do not already exist.
For example, in an e-commerce software a user can typically have zero or more orders, each order having zero or more order lines, each order line having exactly one product; this would link the users, orders, order lines, and product tables using three foreign key constraints: users to orders, orders to order lines, order lines to product tables.
When restoring the database the constraints will most likely fail to validate. After all, the database tables may not exist at all, or they may exist but not have all the necessary records yet. This leads to a chicken and egg situation: you cannot restore the database unless all foreign key constraints are valid, but foreign key constraints will not be valid until you restore the database.
The solution to this chicken and egg situation is to disable the foreign key constraint checks at the database level for the duration of the restoration. This is what BRS does by default. If for whatever reason you do not want to do that (and you fully understand the consequences), you can enable this option here. That said, the most likely outcome is that your database restoration will fail. If that happens, please do not ask for support; instead, disable this option and try the restoration again, as it was intended all along.
- No auto value on zero
A lot of database tables created by modern software have a column using a feature called auto-number. When no value, or a value of zero, is provided for this column it will automatically be assigned a monotonically increasing integer thereby automatically numbering each row added to the table.
Some software creates a special row where the auto-number column deliberately has the value of zero. Restoring that special row requires this option to be enabled. Having this option enabled when no such special row exists does not cause any problems, hence this option being enabled by default.
If you have a particular use case where you know the zero value in an autonumber column is wrong and would like to instead assign it a non-zero value you can disable this option. Please note that you must fully understand the consequences of doing so before disabling this option.
- Use REPLACE instead of INSERT
BRS will always try to delete or rename existing tables (see With existing tables), create the table afresh, then use INSERT statements to create new rows into the now-empty table.
There are use cases where deleting or renaming the table is not possible, but you are happy just overwriting existing data with that from the backup. If this is the case, you need to enable Use REPLACE instead of INSERT, Stop on CREATE error, and Stop on other error. The combination of these options will allow BRS to ignore the errors from being unable to delete and create afresh the database tables, then allow it to use REPLACE instead of INSERT to overwrite existing data instead of trying to add new records.
- Force UTF-8 collation on database
By default, BRS will not try to change the collation of your database. It is left to what is the default.
When this option is enabled, BRS will try to change the collation of the database. If Allow UTF8MB4 auto-detection is enabled and the database server allows UTF8MB4 data the collation will be set to utf8mb4. In any other case, it will be set to utf8 which is a three-byte UTF-8 collation.
- Force UTF-8 collation on tables
By default, BRS will not try to change the collation of your tables. It is left to their defined collation (if any) at backup time.
When this option is enabled, BRS will try to change the default collation of the table and every column with a type which supports setting a collation (such as VARCHAR). If Allow UTF8MB4 auto-detection is enabled and the database server allows UTF8MB4 data the collation will be set to a four-byte UTF-8 collation. In any other case, it will be set to utf8_general_ci which is a three-byte UTF-8 collation.
See “Handling multi-byte data” below.
- Allow UTF8MB4 auto-detection
When enabled, BRS will detect if your database server supports 4-byte UTF-8 data. Otherwise, it will assume that your database server only allows legacy 3-byte UTF-8 data.
See “Handling multi-byte data” below.
- Normalise character set
Allows BRS to translate the character set explicitly set on a table or a column to what is appropriate for the database server you are restoring to. Enabled by default, and recommended to be left enabled when transferring a site between different database server types (e.g. MySQL to MariaDB, or vice versa), or different database server versions (e.g. MySQL 5.6 to 8.0).
See “Handling multi-byte data” below.
- Stop on CREATE error
Should the restoration halt with an error if a CREATE TABLE / PROCEDURE / FUNCTION / TRIGGER / EVENT command fails?
See “Handling database errors” below.
- Stop on other error
Should the restoration halt with an error if a database command other than a CREATE fails?
See “Handling database errors” below.
Handling multi-byte data
Modern PHP software and database servers support multi-byte Unicode data encoded as UTF-8. However, there are two variations of UTF-8: 3-byte and 4-byte. The 3-byte UTF-8 supports the characters used in most Western languages, as well as some modern Japanese and Chinese writing systems. They do not, however, support traditional Chinese, Kanji japanese, emojis, and some less common writing systems (e.g. Cherokee). For this, you need a 4-byte UTF-8 encoding.
If your backed up site was using a 4-byte UTF-8 encoding and you downgrade it to a 3-byte encoding you will end up with broken characters (question marks) wherever any character that cannot be encoded in 3 bytes, such as an Emoji, is used.
Conversely, if your backed up site was encoded in 3-byte UTF-8 and you are restoring it on a modern server you need to upgrade it to 4-byte UTF-8 so that you can now use characters that need 4 bytes to be encoded, such as Emoji.
To make matters more complicated, even if your database server supports 4-byte UTF-8 there are different collations for it. The collation controls, among other things, the order in which data sorted alphabetically is shown.
BRS is aware of all these nuances, and relies on your settings to decide what to do. The following use cases are supported.
A. From 4-byte to 4-byte collation
Condition: both the server you backed up from, and the server you are restoring to support 4-byte UTF-8 data.
How to handle: enable both the Allow UTF8MB4 auto-detection and Normalise character set options, disable the Force UTF-8 collation on tables option (default). This allows BRS to perform any necessary automatic conversions between 4-byte UTF-8 collations depending on the database server type. The conversion only applies to table and column collations which have been explicitly set on the backed up site's database. The resulting collation depends on your restored site's database server type and version:
uca1400_ai_ci on MariaDB 10.10.2 or later
utf8mb4_unicode_ci on Maria DB 10.10.1 or earlier, and MySQL 5.5 or earlier
utf8mb4_0900_ai_ci on MySQL 8.0 or later
utf8mb4_unicode_520_ci on MySQL 5.6 and 5.7
B. From 4-byte to 3-byte collation
Condition: the server you backed up from supports 4-byte UTF-8 data, but the server you are restoring to only supports 3-byte UTF-8 data.
How to handle: disable both the Allow UTF8MB4 auto-detection and Normalise character set options, enable the Force UTF-8 collation on tables option. The collation of all tables and columns with character data is set to utf8_general_ci.
Warning
Any character data which cannot be expressed in a 3-byte UTF-8 collation (e.g. Emoji, traditional Chinese, Kanji, etc) will be replaced with the Unicode Replacement Character (�). This results in a data loss.
Note
If you do not leave the default options in this case you will get a restoration error. For what it's worth, all versions of Joomla and WordPress released after 2019 strongly encourage, or even have a soft requirement, of a database server with 4-byte UTF-8 support to function properly. It is, therefore, not recommended to restore Joomla 3.7 or later, or WordPress 4.2 or later on a database server which does not support 4-byte UTF-8 data even when it's technically possible.
C. From 3-byte to 4-byte collation
Condition: the server you backed up from only supports 3-byte UTF-8 data, but the server you are restoring to supports 4-byte UTF-8 data.
How to handle: enable all three Allow UTF8MB4 auto-detection, Normalise character set, and Force UTF-8 collation on tables options. The collation of all tables and columns with character data is set to the 4-byte collation appropriate for your database server make and version:
uca1400_ai_ci on MariaDB 10.10.2 or later
utf8mb4_unicode_ci on Maria DB 10.10.1 or earlier, and MySQL 5.5 or earlier
utf8mb4_0900_ai_ci on MySQL 8.0 or later
utf8mb4_unicode_520_ci on MySQL 5.6 and 5.7
No data loss takes place.
Note
If you do not enable the Force UTF-8 collation on tables (therefore using the default settings) the restoration will still work. However, you will only be able to use 3-byte UTF-8 encoded data on your restored site. This is to say, even though your database server supports 4-byte UTF-8 data, you will not be able to use Emoji, Traditional Chinese, Kanji Japanese, etc.
D. Changing the database collation
Condition: You want to change the default database collation to match what is best for your database server make and version. This can be applied together with any of the A, B, or C use cases, or on its own.
How to handle: Enable the Force UTF-8 collation on database option.
If you have disabled the Allow UTF8MB4 auto-detection option, the database will be set to the 3-byte utf8 character encoding.
If you have enabled the Allow UTF8MB4 auto-detection option, the database will be set to:
the 3-byte utf8 encoding on MySQL 5.5.2 or earlier, and MariadDB 5.x (versions prior to 10.0.0)
the 4-byte utf8mb4 encoding in any other case.
Handling database errors
In some rare instances you may get a database error when restoring a site. This is not caused by Akeeba software, but by the data you're trying to restore (in other words: you would get the error even manually importing the SQL file using phpMyAdmin).
If that data is not crucial, your site would still work perfectly fine without it if you were able to continue the restoration despite the error. Think about log data, stats, or article metadata that may be too large for your new database: if one page is missing an image, or even some formatting, that's something you can manually fix later. This is when the options Stop on CREATE error and Stop on other error may come in handy.
By default BRS will stop when an error occurs. If you disable these options BRS will ignore all database errors, showing you a report of the failed queries instead. This allows you to review them and understand which part of the old database wasn't restored in the new one. The failed queries' log will also be saved in the failed_queries_*.log files under the installation directory.
Fine Tuning
These options control the amount of work performed in each restoration step. We break the restoration into smaller steps to prevent the restoration from failing due to a timeout or server limit. Remember, there are many of these limits in play: the PHP maximum execution time limit, the PHP memory limit, the web server maximum time limit waiting for a request to be handled by PHP, the server's maximum CPU time limit, the database's connection time limit, the database's maximum queries per predefined time window, and the web server's maximum number of requests per predefined time window. Exceeding any of these would make the restoration fail.
The Maximum execution time option should be left at its default values unless you get AJAX or timeout errors while BRS is restoring your database. In you get a restoration failure, try setting it to 5, 3, 2 or even 1 – in this order. This will slow down the restoration a bit, but it will make it more resilient to timeout issues.
The Throttle time (msec) should be left at 250 unless you are told by our support staff to change it.
Restoration progress
When you're ready with all those settings, click on the button on the top right corner of the installer page to start restoring your database. The restoration progress dialog appears:
 |
While the database restoration is taking place you see the following information:
Restored: How much data has been read from the SQL dump files.
Note
Even thought this item is called “Restored”, it's not really how much data has been written into the database. This is why you will see this being quite substantial when you've only selected a couple of small tables to restore. Don't worry; when the Select which database items to restore option is selected the data is read, but only the data from the selected database items will be restored.
Total size: The total size of the SQL dump files for this database.
Estimated time left: This is an approximate, rolling window estimate of the time left. It won't be very accurate. If you are interested in the technical details of why it's impossible to make an accurate estimate for the time left on a process that does not have a constant execution speed, we'd recommend watching Dave Plummer's video on the decisions he made writing the Microsoft Windows progress dialog. The points he makes apply to the estimated time left during database restoration.
If a resumable error occurs, you will see the following retry dialog.
 |
By default, the restoration will resume at the point it was interrupted in ten seconds. You can force it to resume faster by clicking on , or give up and make it give a stop error by clicking on .
The idea here is that many times the restoration is halted by the server simply because a timeout occurred. Instead of failing the entire restoration it is possible to just give it some time, and retry the same thing.
Important
This may result in duplicate content being created in some table(s). To prevent that, the first time you get a retry dialog click on Cancel, enable the Use REPLACE instead of INSERT option and retry. The next time you get a retry dialog wait the full ten seconds for BRS to retry the query. Using the REPLACE instead of INSERT option will not result in duplicate content, since such duplicate content would be overwritten by REPLACE instead of being created afresh by INSERT.
Should an stop error occur, or after three times of receiving a retry dialog and getting stopped at the same database restoration step, you will receive an error dialog instead.
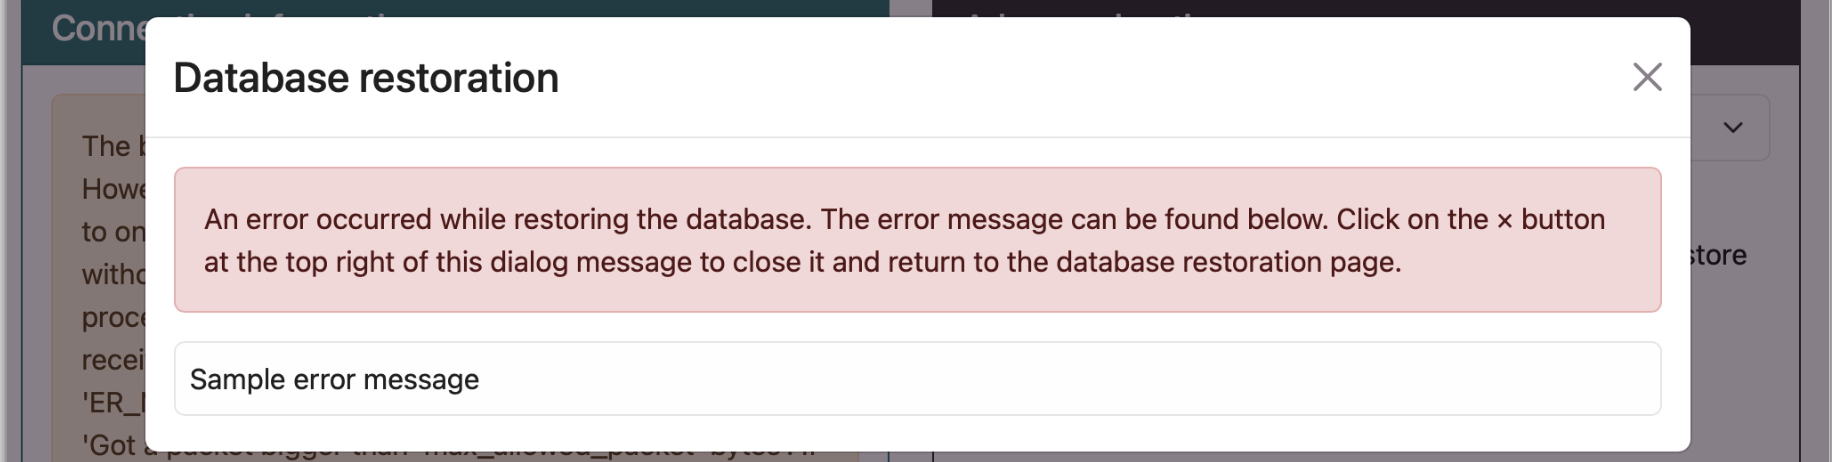 |
Read the error message to understand the nature of the problem. In most cases you can close the dialog, modify your settings and retry the restoration by clicking the button again.
Once the restoration is successfully concluded the button appears in the success dialog.
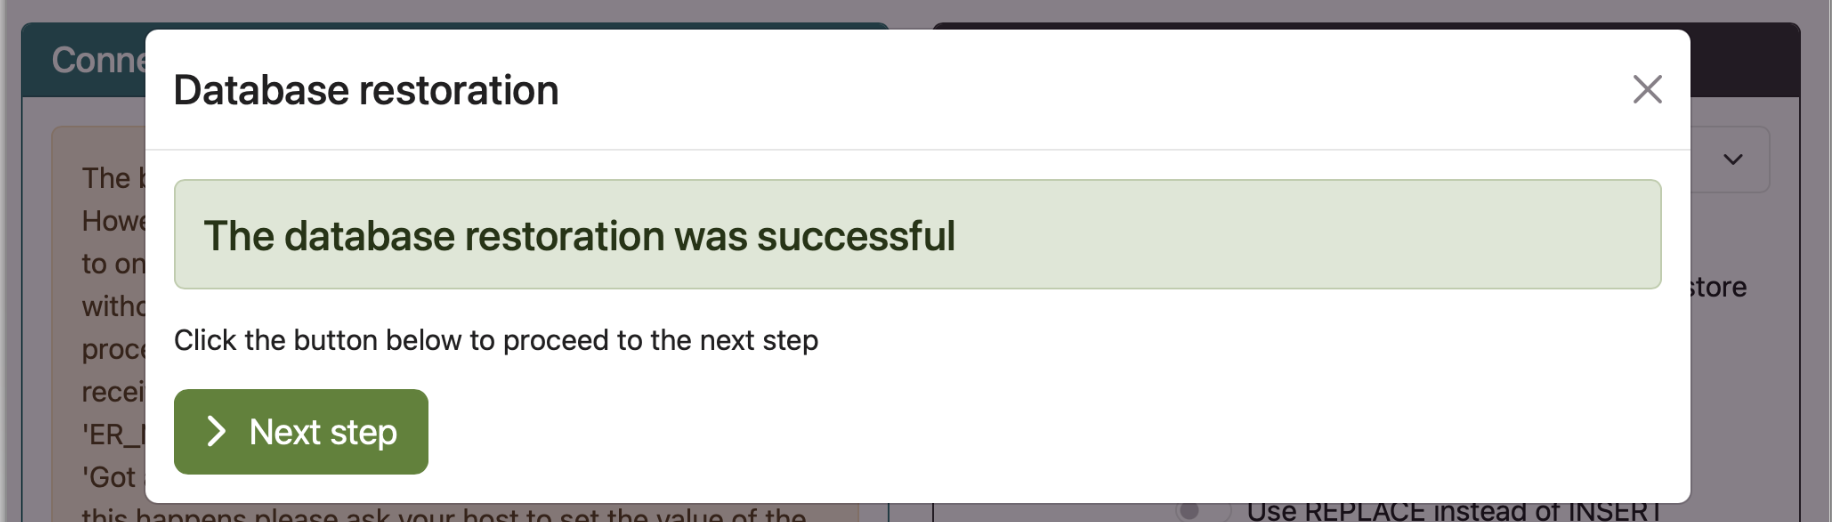 |
Click on that button to proceed to the next restoration step.
If you have more databases to restore (only backups made with the Professional versions of our backup software, using the Multiple Database Definitions feature) you will see the database setup page again, but the header will read the name of the extra database instead of Site's main database. Remember, you can choose to skip the restoration of a database if you so wish.
If there are no more databases left to restore, clicking takes you to the next page of the restoration script:
If you don't see that page, maybe you want to take a look at this troubleshooting page.